
How to Photograph Stonehenge: Tips, Timing, and Access
About the Author: Susan & Doug

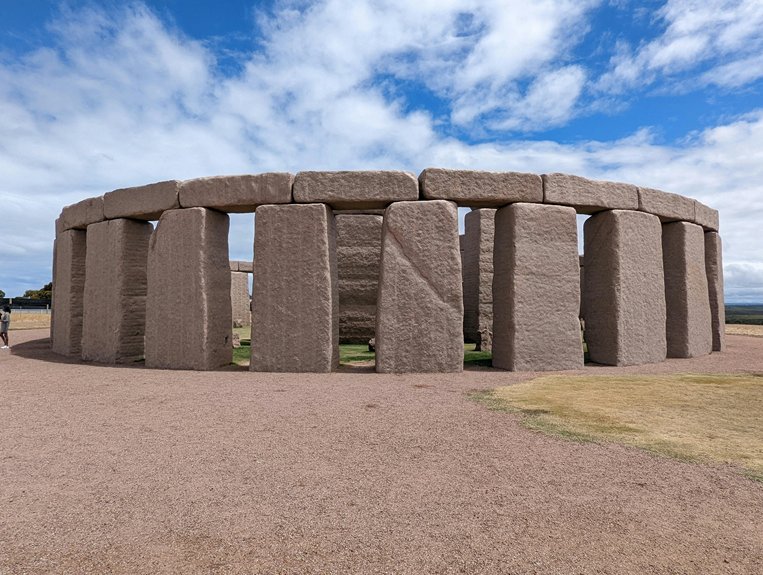
Stonehenge stops most photographers cold the moment they see it. You want a shot that feels timeless, but crowds, flat light, and limited access can work against you fast. We’ve broken down exactly what you need to know—from the best moments to arrive to the gear choices that truly matter on-site. Whether you’re planning your first visit or your fifth, what’s ahead will change how you approach the whole thing.
Quick Answer
- Shoot during golden hour at sunrise or sunset for warm, directional light that enhances Stonehenge’s textures and dramatic shadows.
- Visit on weekday mornings or late afternoons to avoid peak crowds and secure cleaner, unobstructed compositions.
- Paid entry allows closer access and detailed shots, while free viewpoints better capture the monument’s full landscape scale.
- Use wide-angle lenses (14–24mm) for sweeping scenes and telephoto lenses (70–200mm) for isolating individual stones and details.
- Stack multiple long exposures in post-processing to digitally remove wandering visitors and preserve the site’s timeless atmosphere.
The Best Time to Visit Stonehenge for Photography
When it comes to photographing Stonehenge, timing is everything. The best time to visit is during sunrise or sunset, when low sun angles bathe the stones in warm, golden light, creating stunning shadows and textures that midday simply can’t offer.
If you’re visiting in winter, you’re in luck. The sun stays low throughout the day, and morning mist often rolls across the plain, adding incredible atmosphere and depth to your shots.
Don’t overlook overcast days, either. Soft, diffuse light eliminates harsh shadows and lets you capture fine surface details beautifully.
Whatever season you choose, avoid midday. Peak tourist traffic makes clean compositions nearly impossible.
Arrive early or stay late — your images will thank you.
What Paid and Free Access Actually Let You Shoot
Whether you pay for a ticket or stick to the free vantage point beside the farmers’ gate, each option shapes what you can truly capture.
Paid entry gets you into the designated viewing zone for wider compositions and some close detail shots, but barriers still keep you from moving freely around the stones.
The free spot offers a genuine alternative with room for creative techniques like stacking shots, though the fences and distance will limit your angles and control.
Paid Entry Shot Opportunities
Choosing between paid entry and free access shapes what you can truly capture, so it’s worth knowing exactly what each option gives you before you arrive. Paid entry to Stonehenge gets you inside the designated pathways, offering viewpoints unavailable from outside.
Here’s what photographing from paid access actually gives you:
- Closer proximity to the stones, revealing texture and scale impossible from the road
- Multiple angles along structured pathways for varied compositions
- Access to the visitor center as an additional subject or backdrop
- Better opportunities for detailed shots, though telephoto lenses still help
However, restrictions remain real. Ropes and fences limit direct contact, so creative framing matters. Paid access improves your results considerably, but it doesn’t eliminate every challenge you’ll face.
Free Vantage Point Limitations
Paid entry clearly opens doors, but the free farmers’ gate viewpoint deserves honest attention too, especially if you’re watching your budget or scouting before committing.
The free vantage point gives you a genuine look at Stonehenge, but its limitations are real. Fences and barriers sit squarely between you and the stones, so you’ll need a telephoto lens to pull in meaningful detail.
Wide compositions become tricky because the fencing interrupts your frame, and creative workarounds only go so far.
You can’t walk among the stones from either access type, but paid tickets at least position you closer with better framing flexibility.
Think of the free viewpoint as a worthwhile starting point, just go in knowing you’ll need to work harder for compelling shots.
Proximity Versus Composition Tradeoffs
Both access types come with genuine photographic strengths, and understanding the tradeoffs helps us make smarter decisions before we even raise the camera.
Here’s what each access level truly delivers:
- Paid access gives us proximity to individual stones, revealing texture, scale, and construction details.
- Fences and pathways inside the site still limit angles, so creative framing remains essential.
- Free vantage points excel at wide, landscape-driven compositions that emphasize Stonehenge’s dramatic setting.
- Distant views from free positions sacrifice intimate detail but capture the monument’s full scale beautifully.
Neither option is objectively better. Paid access rewards detail-focused photographers; free vantage points reward landscape storytellers.
Knowing what we want to shoot before arriving means we’re never caught unprepared.
Choose Your Gear Based on the Shot You Want
Whether you’re shooting on a tight budget or with a full kit, your lens choice will shape everything about your final image. A 14–24mm wide-angle lens pulls in the entire circle and the sweeping Salisbury Plain behind it.
A 70–200mm telephoto lets you compress distance and isolate a single weathered stone face in striking detail.
We’d also encourage you to contemplate a 24–70mm zoom as your workhorse lens—it handles both the grand scale and the moderate close-ups without forcing a lens swap mid-session.
Gear for Every Budget
Capturing Stonehenge beautifully doesn’t require a massive investment in gear—it requires choosing the right tool for the shot you’re after. Match your equipment to your budget and goals:
- Smartphones or point-and-shoot cameras with a 28mm lens handle wide, sweeping Stonehenge scenes affordably.
- Compact cameras with telephoto lenses (70–200mm) isolate individual stones and distant details without costly equipment.
- Entry-level DSLRs or mirrorless cameras deliver better image quality, low-light control, and HDR flexibility at moderate cost.
- Full-frame cameras with wide-angle or macro lenses unlock creative perspectives and rich textural detail for advanced photography.
Regardless of your budget, add a tripod to your gear list. Affordable options exist for every level, and they’re essential for sharp long exposures at Stonehenge.
Lens Choice Matters
When it comes to photographing Stonehenge, your lens choice shapes the story you’re telling more than almost any other decision.
Want to capture the entire circle with sweeping landscape behind it? Reach for a wide-angle lens in the 14–24mm range.
Prefer isolating a single weathered stone against a moody sky? A telephoto lens between 70–200mm does that beautifully.
For everyday versatility without swapping glass constantly, a 24–70mm standard zoom handles both wide scenes and closer details comfortably.
If you’re drawn to the finer things—lichen textures, ancient tool marks, subtle surface weathering—a macro lens reveals details most visitors walk right past.
Think about the story you want to tell first, then let that guide your lens choice.
Compose Stronger Stonehenge Shots From Any Position
Strong composition transforms an ordinary Stonehenge photo into something truly memorable, and we can achieve it from virtually any position around the site. Here’s how we make every frame count around the stone circle:
- Use wide-angle lenses to capture the full monument alongside the surrounding landscape, emphasizing scale and context.
- Frame naturally using trees, clouds, or nearby stones to add depth and direct focus.
- Vary your angles — shoot low to amplify height or find elevated spots for sweeping panoramic scenes.
- Utilize leading lines from pathways or natural features to pull the viewer’s eye straight toward the monument.
Shooting through gaps between stones also creates intimate, dynamic compositions worth exploring.
Use Weather and Light to Your Advantage at Stonehenge
Once we’ve nailed our compositions, light and weather become our most powerful creative tools at Stonehenge.
Golden hour, just after sunrise or before sunset, wraps the stones in warm, directional light that brings out every textured surface and shadow.
Don’t dismiss overcast days — diffused light eliminates harsh shadows and creates a beautifully moody atmosphere.
Watch for cloud breaks, too, since dramatic sky patterns add serious depth to any shot.
Stormy weather deserves real attention.
Dark clouds, rain-soaked stones, and reflective puddles create a sense of mystery that clear days simply can’t match.
Early morning mist is arguably our greatest ally here.
That soft, ethereal fog makes Stonehenge feel genuinely ancient, reinforcing everything that draws us to photograph it in the first place.
Remove Crowds From Your Stonehenge Photos in the Field
Crowds are perhaps the biggest practical challenge we face at Stonehenge, but a few smart field strategies make a real difference.
- Visit early morning or late afternoon when crowds thin naturally and the light improves simultaneously.
- Shoot on weekdays to avoid peak visitor numbers and enjoy a calmer, more manageable scene.
- Use a telephoto lens to compress distance and frame out crowds lurking at the edges.
- Bracket multiple shots over 30 seconds, then stack them in post-processing to remove moving people entirely.
We can also use foreground elements—tall grasses, fence lines, or low shrubs—to redirect attention toward the stones themselves. Combining these approaches gives us far cleaner compositions without waiting endlessly for crowds to disappear.
Camera Settings That Deliver at Stonehenge
Getting our camera settings right transforms a good Stonehenge shot into a great one. We recommend shooting at f/8 to f/16 to keep both the stones and surrounding landscape sharp throughout the frame. Pair that with a low ISO between 100 and 200 to reduce noise and preserve crisp detail, especially under bright skies.
During golden hour or low-light conditions, we’ll slow the shutter speed down and mount the camera on a tripod for stability.
Switch to manual focus too — autofocus tends to hunt in tricky lighting, and we want precise control over our focal point.
Finally, shoot RAW. It’s the single best camera setting decision we can make, giving us full flexibility to refine exposure, contrast, and color during editing.
Post-Processing Techniques to Refine Your Stonehenge Images
Even the best Stonehenge shots benefit from thoughtful post-processing, and a few targeted techniques make a real difference.
Here’s what we recommend adding to your post-processing workflow:
- Stack multiple exposures taken over 30 seconds to erase wandering visitors and passersby cleanly.
- Blend images to enhance textures, boost contrast, and deepen the site’s atmospheric qualities.
- Correct converging verticals and straighten horizons to tighten overall composition.
- Retouch modern distractions — fencing, signage, or stray litter — to preserve Stonehenge’s timeless character.
These steps aren’t about manufacturing a false scene; they’re about revealing what drew us there in the first place.
A little patience in post-processing transforms a solid capture into something genuinely memorable.
Frequently Asked Questions
How to Get Special Access to Stonehenge?
We’d recommend booking Exclusive Tours through English Heritage for special access. They offer intimate stone circle visits at dawn or dusk, letting us photograph up close without the usual crowds. Check their website for availability!
Is It Better to Visit Stonehenge in the Morning or Afternoon?
We’d recommend mornings for your time preference! You’ll enjoy softer golden light, longer shadows enhancing Stonehenge’s textures, and fewer crowds for unobstructed shots. Afternoons work well if you’re after dramatic backlighting and detailed visibility instead.
How Many Bodies Were Found Under Stonehenge?
Like whispers from the past, Archaeological Discoveries reveal we’ve found remains of around 50 individuals buried at Stonehenge. These cremated and inhumed remains span centuries, confirming this iconic site’s powerful role as a sacred burial ground.
Can You Take Photos at Stonehenge?
Yes, we can take photos at Stonehenge! Photography permits allow us to shoot from designated viewing areas. We’ll want to bring a tripod for stunning, stable shots—especially during those magical golden-hour lighting conditions!
Conclusion
Stonehenge rewards photographers who prepare. Imagine arriving at 5:30 a.m. on a misty June morning, tripod set, wide-angle ready—the stones emerging through fog before a single tourist appears. That’s the shot. We’ve covered timing, access, gear, composition, light, crowd removal, settings, and post-processing because every element connects. Apply even a few of these techniques, and you’ll leave with images that feel genuinely timeless, not just snapshots of a crowded tourist site.
Before You Buy
Gear prices shift frequently — worth checking current listings before you buy. Browse the latest deals on travel photography gear at Amazon →
Looking for a tours of Stonehenge check out all the Stonehenge tours offer →
Need accommodations, or airfare while in the area, we like to use Trip.com →
Compare car rental options at DiscoverCars.com→
Keep Reading
Get the Free Europe Photography Packing Checklist
Everything we pack for a 2-week photography trip across Europe — free when you subscribe.
No spam, ever. Unsubscribe anytime.