
How to Shoot Long Exposure Photos While Traveling Without a Tripod
About the Author: Susan & Doug

Most travel photographers we know leave their tripods at home at least some of the time — the weight and bulk just don’t justify the space in a carry-on bag. But that doesn’t mean we have to sacrifice stunning long exposure shots.
Quick Answer
- Rest your camera on stable surfaces like walls, ledges, rocks, or railings to minimize movement during long exposures.
- Set ISO to 100, use narrow apertures like f/16, and keep shutter speed between 1/10 and 1/30 seconds.
- Enable image stabilization on your lens or camera body to reduce blur during handheld shooting.
- Shoot at least 10 consecutive burst mode frames, maintaining consistent exposure settings throughout.
- Stack and align multiple frames in Photoshop using Smart Objects and Stack Mode: Mean to simulate long exposure.
Rest Your Camera on These Surfaces When You Travel Without a Tripod
When traveling without a tripod, resting your camera on stable surfaces like walls, benches, ledges, stairs, or window sills can still get you sharp long exposure shots. These everyday surfaces provide surprisingly reliable support and do a solid job of minimizing camera movement during longer exposures.
Household items work great for improvised support too. Filled socks, plastic bags packed with heavy materials, or low tables are all worth trying when you need to stabilize your camera on the fly.
And once you’re outdoors, natural and man-made objects like rocks, fences, and railings quickly become your best friends as shooting platforms.
The real trick is training yourself to look at your surroundings differently and adjust your composition around whatever stable surface happens to be nearby.
Once you get into the habit of scoping out sturdy, accessible objects before you shoot, you’ll be amazed at how consistently sharp your long exposure images become — all without adding a single extra piece of gear to your bag.
Set ISO, Aperture, and Shutter Speed for Handheld Long Exposures
Getting your camera settings right is the real foundation of sharp handheld long exposures — get this part wrong and nothing else matters. Here’s exactly what we’d dial in:
- ISO: Start at the lowest setting available, like ISO 100, to keep noise minimal.
- Aperture: f/8 to f/11 is the sweet spot for most cameras — sharp across the frame without diffraction softening. Use f/16 only when you specifically need maximum depth of field or to slow your shutter speed further.
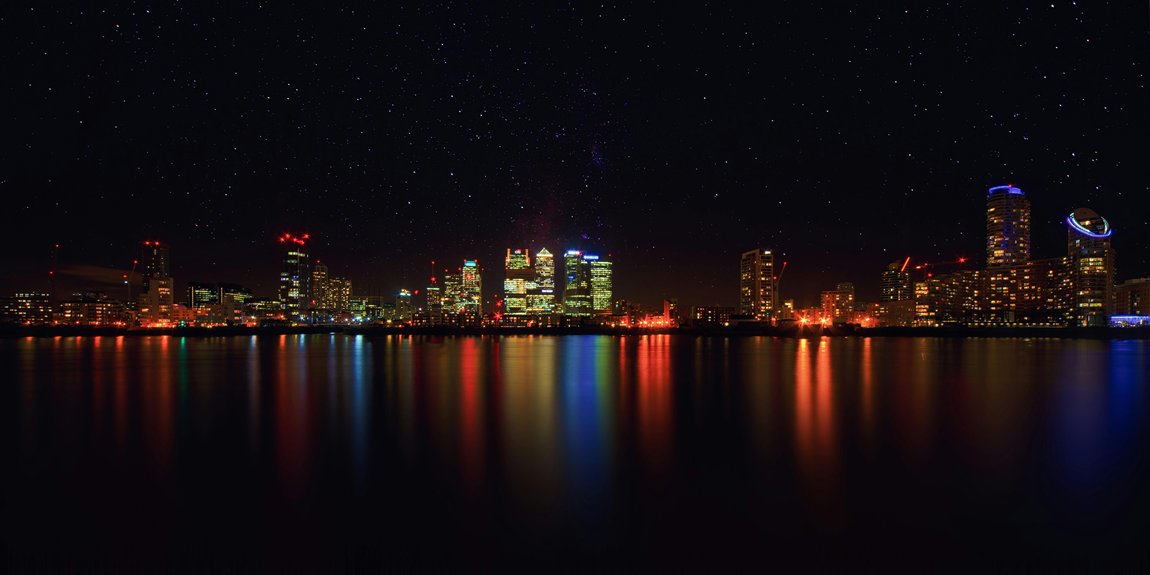
- Shutter speed: Keep it between 1/10 and 1/30 seconds — the longest we recommend pushing handheld before blur starts creeping in. Note: These shutter speeds apply to individual frames in your burst sequence for stacking. True long exposures of several seconds still require a stable surface — these techniques won’t replace a tripod for 10-30 second exposures.
- Image stabilization: Turn it on if your lens or camera body supports it; honestly, it makes a genuine difference out in the field.
- Post processing: Stack or blend multiple shots to simulate true long exposure results without sacrificing sharpness.
Work through these settings one by one, and you’ll find yourself consistently walking away with cleaner, sharper handheld exposures — even in tricky lighting conditions.
Shoot Multiple Exposures in Burst Mode to Prepare for Stacking
Burst mode is where the real magic of handheld long exposure stacking begins. Set your camera to burst mode and fire at least 10 consecutive shots, roughly one per second, so each frame overlaps enough for clean alignment later.
Rest your camera against any stable surface you can find — a wall, railing, or bag — to reduce shake between shots.
Keep your exposure settings consistent across every frame. Once you’ve finished shooting, go through the sequence and pull out any images with excessive blur or sudden movement.
We recommend keeping only the tightest, most uniform frames from the batch.
From there, bring your selected frames into post-processing software to align and stack them. This process merges your shorter exposures into one smooth, polished long exposure — and honestly, nobody looking at the final image will ever guess you didn’t have a tripod with you.
Stack and Align Your Shots in Photoshop for Sharper Results
Once you’ve got your burst sequence culled down to your best frames, it’s time to bring them into Photoshop and start stacking. Load your shots as layers, then follow these steps:
- Run Auto-Align Layers with Projection set to Auto to correct any camera shift.
- Convert all aligned layers into a single Smart Object — this keeps everything non-destructive so we can always step back if needed.
- Apply Stack Mode: Mean to blend exposures and simulate a long exposure effect.
- Use layer masks to selectively blend problem areas caused by movement or shake.
- Compare results against your original RAW files to restore detail where needed.
We’ve found this workflow keeps everything flexible in a way that lets us fine-tune the blend without permanently altering our source images — and honestly, that safety net is worth its weight in gold when you’re deep into an edit at midnight.
Mask Out Motion Blur With Selective Layers in Photoshop
Even with a solid stack blend, some areas of your image may still show unwanted motion blur — and that’s where selective layer masking really saves the day. In Photoshop, place your long exposure shot and a sharper reference image on separate layers.
Add a layer mask to the top layer, then use the Brush tool with a soft edge to paint over blurred regions, revealing the sharper layer underneath.
For moving elements like water or clouds, we recommend converting your long exposure into multiple layers, aligning and masking each one to reduce motion blur selectively.
From there, add adjustment layers with layer masks to fine-tune the progression, making sure the blend looks natural rather than forced.
This approach gives us precise control over which areas stay sharp and which retain that silky, intentional blur we actually want.
Gear That Makes Long Exposure Easier
If you’re serious about long exposure travel shots these are worth having:
- A travel tripod — the ultimate long exposure solution → Best travel tripods that fit carry-on →
- A GorillaPod for improvised stable surfaces → Best GorillaPods for travel →
- A mirrorless camera with in-body stabilization → Best mirrorless cameras for travel →
- ND filters for daytime long exposures → Shop ND filters on Amazon →
Affiliate links — we earn a small commission at no extra cost to you.
Frequently Asked Questions
What Can I Use if I Don’t Have a Tripod?
For camera stabilization without a tripod, we can use alternative supports like walls, rocks, or railings. We can also try handheld techniques—brace against your chest, use both hands, or grab a GorillaPod for flexible mounting options.
Do You Need a Tripod for Long Exposure?
Want stunning shots without a tripod? We don’t always need one! By mastering camera stability through creative supports, we can nail exposure techniques and adapt to various lighting conditions, capturing sharp, beautiful long exposures successfully.
How to Take Photos Without a Tripod?
We can take handheld photos without a tripod by using these camera stabilization tips: brace your elbows close to your body, use alternative supports like walls or rocks, and set a timer to reduce shake.
What shutter speed is too slow to handhold?
As a general rule anything slower than 1/focal length becomes risky handheld — so with a 50mm lens, 1/50 second is your minimum. With in-body stabilization you can push 3-4 stops slower, but for long exposure stacking we recommend keeping individual frames between 1/10 and 1/30 seconds and relying on the stacking technique rather than trying to handhold very long single exposures.
Conclusion
We don’t always have a tripod when the perfect light appears — and that’s okay. By steadying your camera on a nearby wall, dialing in the right settings, and stacking your burst shots in Photoshop, we’re turning happy accidents into intentional art. The moment the golden hour hits just as you’re passing a quiet street corner, you’ll already know exactly what to do. No tripod needed, just technique.
Put It Into Practice
Ready to shoot long exposures on the road? Browse our recommended gear on Amazon →
Get the Free Europe Photography Packing Checklist
Everything we pack for a 2-week photography trip across Europe — free when you subscribe.
No spam, ever. Unsubscribe anytime.